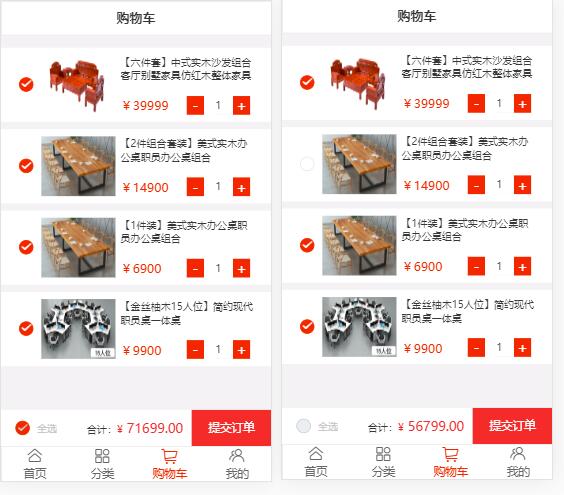
做一些电商或者支付页面,肯定少不了购物车功能,一方面正反选,另一方面动态价格,全选之后再去加减商品数量(这里必须考虑 里面有很多蛋疼的问题)猛的一想,感觉思路很清晰,但是,真正动起手来就各种bug出来了,说实话 搞这个购物车,浪费我整整一下午的时间,当我回过头捋一遍,其实,半小时就能完事。就是因为全选的时候 我又去更改商品数量,然后调用算价格的方法导致浪费了太多时间,话不多少,还是先上图吧
先看看需求文档吧


代码格式不是很整齐 编辑器没有调整 凑合看吧
<template>
 <div class="pddingTop">
 <van-nav-bar title="购物车" left-text="" fixed></van-nav-bar>
 <div class="shopContent">
 <ul>
 <li v-for="(item,i) in dataList" :key="i" >
  <div class="shopmain">
  <van-checkbox v-model="item.checked" @change="signchecked(item)"></van-checkbox>
  <div class="shops" @click="todetails(item.productCode)">
  <div class="shopImg"><img :src="item.productUrl" alt=""></div>
  <div class="shopsright">
  <h4>{{item.productName}}</h4>
  <div class="shoprightbot">
   <span>¥{{item.price}}</span>
   <div class="shopradd">
   <button @click.stop="reducebuyNum(item.buyNum,item,item.productCode,i)">-</button>
   <van-field style="width:40px;text-align: center" readonly v-model="item.buyNum" type="number" />
   <button id="button" @click.stop="addbuyNum(item.buyNum,item)">+</button>
   </div>
  </div>
  </div>
  </div>
  </div>
 </li>
 </ul>
 </div>
 <div v-show="!dataList.length" class="shopping">
 <div><img src="./images/shopping.png" alt=""></div>
 <p>暂无商品</p>
 </div>
 <div>
 <van-submit-bar
 :price="total*100"
 button-text="提交订单"
 @submit="onSubmit"
 >
 <van-checkbox v-model="ischecked" disabled="disabled" @click="checkAll">全选</van-checkbox>
 </van-submit-bar>
 </div>
 </div>
</template>
<script>
//toast 我全局引用了
import {Checkbox, SubmitBar,Card ,Field,Cell,Dialog, Toast } from 'vant';
import utils from '../utils/utils' //这里是自己封装的方法 获取
export default {
 components:{
 [SubmitBar.name]:SubmitBar,
 [Checkbox.name]:Checkbox,
 [Card.name]:Card,
 [Field.name]:Field,
 [Cell.name]:Cell,
 },
 data(){
 return{
 img:require("./images/gouwuche.png"),
 ischecked:false,
 dataList:[],
 total:0,
 disabled:false,
 }
 },
 methods:{
 todetails(productCode){
   this.$router.push('/commodityDetails?productCode='+productCode)
 },
  //商品加加
 addbuyNum(num,value){
 if(value.buyNum<=98){
 value.buyNum++
 this.shopNumber(value)
 this.amount(value)
 }
 },
  //商品减减
 reducebuyNum(num,value,productCode,i){
 if(value.buyNum<=1){
 Dialog.confirm({
  title: '温馨提示',
  message: '是否删除商品'
  }).then(() => {
  this.https('后台接口',{productCode:productCode})
  .then(data=>{
  Toast({
  message:'删除成功',
       duration:800
  })
  })
  setTimeout(()=>{
       //这里千万不能再调用 要把这个数组里面去除掉 不然问题是很多
  this.dataList.splice(i,1)
  this.amount(value)
  },1000)
  }).catch(() => {
 });
 }else{
 value.buyNum--
 this.shopNumber(value)
 this.amount(value)
 }
 },
 // 提交订单
 onSubmit(){
 let cartIdList = []
 this.dataList.forEach(element => {
 if (element.checked) {
  cartIdList.push(String(element.dataId))
 }
 });
 if (cartIdList.length<1) {
 Toast.fail('请选择订单');
 } else {
 utils.putlocal('cartIdList',JSON.stringify(cartIdList))
 this.$router.push('/placeorder');
 }
 },
 //加减 这里之前是自己手写了 但是参考别的网站后 这里是通过接口加减的
 shopNumber(value){
 let data = {
 dataId :value.dataId,
 buyNum:value.buyNum,
 productCode:value.productCode
 }
 this.https('后台接口',data)
 .then(data=>{

 })
 },
 // 单选
 signchecked(val){
 this.amount(val)
 },
 amount(val){
 let arr =[]
 let MoneyList=[]
 this.dataList.forEach(item=>{
 if(item.checked===true){
  MoneyList.push(item)
  arr.push(item.checked)
 }
 })
   //这里就是判断时候为全选
 if(arr.length===this.dataList.length){
 this.ischecked = true
 }else{
 this.ischecked = false
 }
   //价格要置为0 不然一直会累加的 也会又很大的问题
 this.total=0;
 for(var i=0;i<MoneyList.length;i++){
 this.total+=MoneyList[i].price*MoneyList[i].buyNum
 }
 },
 // 全选 这里的事件有两中 一个是click 一个是change 不同的事件用不同的方法
 checkAll(){
 this.dataList.forEach(item=>{
 if(this.ischecked==false){
  item.checked=true
 }else{
  item.checked=false
 }
 })
 },
 // 列表
 shoppingCartlist () {
 this.https('后台接口',{})
   .then(data=>{
    if(data.code=='success'){
     //这里需要手动添加默认的checked 后台没有返
  data.data.forEach(element => {
  element.checked = false
  element.num = null
  });
  this.dataList = data.data
  if(!this.dataList.length){
  this.disabled=true
  }
    }else {
     Toast.fail(data.message);
    }
   })

 }
 },
 mounted () {
 this.shoppingCartlist ()
 }
}
</script>
<style lang="less" scoped>
.van-submit-bar{
 bottom:49px;
 padding-left:20px;

}
.shopContent{
 margin-top:18px;
 padding-bottom:90px;
}
.shopping{
 text-align: center;
 padding-top:99px;
 img{
 width:96px;height:96px;
 margin-bottom: 25px;
 }
}
li{
 padding:0 15px;
 background:#ffffff;
 margin-bottom:10px;
 position: relative;
 height:103px;
 .shopmain{
 display: flex;
 padding:10px 8px 10px 10px;
 position: relative;
 .shops{
 display: flex;
 .shopImg{
 width:103px;height:83px;
 margin:0 7px 0 11px;
 img{
  width:100%;height:100%;
 }
 }
 .shopsright{
 width:185px;
 display: flex;
 flex-direction:column;
 justify-content: space-between;
 h4{
  display: -webkit-box;
  -webkit-box-orient: vertical;
  -webkit-line-clamp: 2;
  overflow: hidden;
 }
 .shoprightbot{
  display: flex;
  justify-content: space-between;
  align-items: center;
  width: 190px;
  span{
  font-size:17px;
  color:#F74022;
  }
 }
 }
 }
 .van-checkbox__icon--checked .van-icon{
 background:red !important;
 }
 }
 button{
 width:24px;height:26px;
 font-size:20px;
 background:#F74022;
 color:#ffffff;
 border:none;
 }
 input{
 width:48px;
 }
}
.shopradd{
 width: 98px;
 display: flex;
 .van-field__control{
 text-align: center !important;
 }
}
.van-cell{
 padding: 0;
 line-height: 26px
}
.van-field__control{
 height: 26px;
}
</style>
关于vue.js组件的好代码教程,请大家点击专题vue.js组件学习好代码教程进行学习。
本文vant如何实现购物车功能到此结束。当你能飞的时候就不好放下飞。小编再次感谢大家对我们的支持!


