为何需要配置多页面?
在实际工作中,肯定会遇到大型项目,往往一个架构里面会开发多个应用,而这些应用又没有太大的关联,但有可能会共用一些组件或者是样式表等,那么就会出现一个问题,打包的时候会将这些互不相关的应用全部打包。
而因为脚手架VueCli所以构建的项目属于单页面应用,因此我们就需要手动去配置,搭建一个多入口,多应用的体系
需求
首页显示各个应用名称,点击进去各自应用
实现
使用vue/cli生成一个vue项目
npm install -g @vue/cli 个人不建议直接全局安装,因为可能会对其他项目造成影响,所以会选择加上 -D 来进行本地安装
然后 vue create project-name (使用本地安装的记得加上 npx )

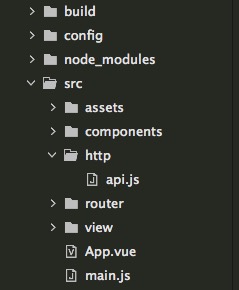
成功创建之后,我们看看当前的目录结构

这里我们需要重构一下我们的目录 让他更可观

配置vue.config.js
let path = require('path')
let glob = require('glob') // 用于筛选文件

// 工厂函数 - 配置pages实现多页面获取某文件夹下的html与js
function handleEntry(entry) {
 let entries = {}
 let entryBaseName = ''
 let entryPathName = ''
 let entryTemplate = ''
 let applicationName = ''

 glob.sync(entry).forEach(item => {
  console.log('!!!', item)
  entryBaseName = path.basename(item, path.extname(item))
  console.log('entryBaseName:', entryBaseName)
  entryTemplate = item.split('/').splice(-3)
  console.log('entryTemplate:', entryTemplate)
  entryPathName = entryBaseName // 正确输出js和html的路径
  console.log('entryPathName', entryPathName)

  entries[entryPathName] = {
   entry: 'src/' + entryTemplate[0] + '/' + entryTemplate[1] + '/' + entryTemplate[1] + '.js',
   template: 'src/' + entryTemplate[0] + '/' + entryTemplate[1] + '/' + entryTemplate[2],
   title: entryTemplate[2],
   filename: entryTemplate[2]
  }
 })

 return entries
}

let pages = handleEntry('./src/applications/**?/*.html')
console.log(pages)

// 以下开始配置
module.exports = {
 lintOnSave: false, // 关掉eslint
 /**
  * baseUrl 从 3.3起废用,使用pubilcPath代替
  * 默认情况下,Vue CLI 会假设你的应用是被部署在一个域名的根路径上,例如 https://www.my-app.com/。如果应用被部署在一个子路径上,你就需要用这个选项指定这个子路径。例如,如果你的应用被部署在 https://www.my-app.com/my-app/,则设置 publicPath 为 /my-app/。
  * 这个值也可以被设置为空字符串 ('') 或是相对路径 ('./'),这样所有的资源都会被链接为相对路径,这样打出来的包可以被部署在任意路径,也可以用在类似 Cordova hybrid 应用的文件系统中。
  */
 publicPath: process.env.NODE_ENV === "production" ? "./" : "/",
 productionSourceMap: false,
 // 入口设置
 pages,
 devServer: {
  index: '/', // 运行时,默认打开application1页面
  // 告诉dev-server在服务器启动后打开浏览器,将其设置true为打开默认浏览器
  open: true,
  host: 'localhost',
  port: 8080,
  https: false,
  hotOnly: false,
  // 配置首页 入口链接
  before: app => {
   app.get('/', (req, res, next) => {
    for (let i in pages) {
     res.write(`<a target="_self" rel="nofollow noopener noreferrer" href="/${i}">/${i}</a></br>`);
    }
    res.end()
   });
  }
 }
}
application1.js
import Vue from 'vue'
import Application1 from './application1.vue'
import router from './router'
import store from './vuex'

Vue.config.productionTip = false

new Vue({
 router,
 store,
 render: h => h(Application1)
}).$mount('#app')
application1.vue

<template>
 <div id="app">
  <a class='tips' rel="nofollow noopener noreferrer" href='application2.html'>
  Hello Im Application1,Clike me can go to Application2
  </a>
 </div>
</template>

<style lang="less">
#app {
 font-family: 'Avenir', Helvetica, Arial, sans-serif;
 -webkit-font-smoothing: antialiased;
 -moz-osx-font-smoothing: grayscale;
 text-align: center;
 color: #2c3e50;
}

.tips{
 display: flex;
 justify-content: center;
 align-items:center;
 color:lightsalmon;
 font-size:20px;
 font-weight:bold;
}

</style>
application1.html

<!DOCTYPE html>
<html lang="en">

<head>
 <meta charset="utf-8">
 <meta http-equiv="X-UA-Compatible" content="IE=edge">
 <meta name="viewport" content="width=device-width,initial-scale=1.0">
 <link rel="icon" rel="nofollow noopener noreferrer" href="<%= BASE_URL %>favicon.ico">
 <title>Application1</title>
</head>

<body>
 <noscript>
  <strong>We're sorry but test-my-ui doesn't work properly without JavaScript enabled. Please enable it to continue.</strong>
 </noscript>
 <div id="app"></div>
 <!-- built files will be auto injected -->
</body>

</html>
同理 application2应用也这样配置 运行
npm run serve
运行


本文VUE.CLI4.0配置多页面入口的如何实现到此结束。如果你期望成功,以恒心为良友,以经验为参谋,以细心为兄弟,以期望为哨兵。小编再次感谢大家对我们的支持!


