早上好,给您新鲜的问候,温暖的祝福,清晨,美好的开端,祝您今天精神振奋,精力充沛,心情愉快,一切都很好!
本文实例为大家分享了vue实现图片上传预览的具体代码,供大家参考,具体内容如下
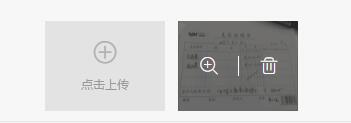
效果图

html结构
<ul class="gallery-window-map" style="flex-wrap:wrap;">
 <!--点击上传按钮-->
 <li class="house-pic-item" v-if="!(!item.isNew&&editBtnType[index])" @click="houseUpload(index)">
  <div class="pic-box">
   <span class="iconfont icon-zengjia"></span>
   <h5 class="btn-tit">点击上传</h5>
  </div>
 </li>
 <!--展示区域-->
 <viewer :images="item.imgUrl">
  <li class="house-pic-item" v-for="(picItem, picIndex) in item.imgUrl" :key="picIndex">
   <img :src="picItem" alt="" :key="picItem" width="120" height="90" :ref="'showImg_'+index">
   <div class="mask">
    <div class="ico-box">
     <span class="font-btn" @click="clickWatchImg('showImg_'+index,picIndex)">
      <i class="iconfont icon-fangda"></i>
     </span>
     <span class="font-btn" v-if="!(!item.isNew&&editBtnType[index])" @click="delHouseImage(index,picIndex)">
      <i class="iconfont icon-shanchu"></i>
      <i class="line"></i>
     </span>
    </div>
   </div>
  </li>
 </viewer>
</ul>
css样式
.gallery-window-map{
 display: -webkit-box;
 display: -ms-flexbox;
 display: flex;
 margin-top: 10px;
}
.house-pic-item {
 position: relative;
 display: inline-block;
 margin-right: 13px;
 width: 120px;
 height: 90px;
 background-color: #e3e3e3;
}
.pic-box {
 width: 100%;
 text-align: center;
}
.icon-zengjia {
 position: relative;
 top: 12px;
 font-size: 26px;
 color: #b2b2b2;
}
.btn-tit {
 height: 38px;
 line-height: 38px;
 font-size: 12px;
 color: #999;
}
.mask {
 display: none;
 position: absolute;
 top: 0;
 left: 0;
 right: 0;
 bottom: 0;
 background: rgba(34, 34, 34, 0.6);
}
.font-btn {
 display: inline-block;
 height: 40px;
 width: 50%;
 padding: 0 20px;
 -webkit-box-sizing: border-box;
 box-sizing: border-box;
}
.font-btn:last-child {
 position: relative;
}
.icon-fangda,
.icon-shanchu {
 font-size: 22px;
 color: #fff;
}
.line {
 content: '';
 display: inline-block;
 position: absolute;
 left: 0;
 top: 10px;
 width: 1px;
 height: 20px;
 background: #fff;
}
/**
 * 模拟点击上传图片按钮
* @index 当前操作的户型box的索引
*/
houseUpload(index) {
 this.$refs.houseTypeLoad[index].click()
},
/**
* 上传图片到服务器
* @index 当前操作的户型box的索引
*/
upLoadHouse(e, index) {
 let _that = this
 const file = e.target.files[0]
 if (!file) {
 return
 }
 new ImageCompressor(file, {
 quality: 0.9,
 maxWidth: 2000,
 maxHeight: 2000,
 success(result) {
 // debugger
 const formData = new FormData()
 formData.append('file', result, result.name)
 formData.append('watermark', false)
 // Send the compressed image file to server with XMLHttpRequest.
 if (result.size > 1 * 1024 * 1024 || result.size < 3 * 1024) {
 _that.$message('图片大小要在3K~1M之间')
 return
 } else {
 _that.$ajax.post('/img/upload', formData).then(res => {
 res = res.data
 if (res.images && res.images.length > 0) {
  if (res.images[0].src !== 'file size is too small') {
  let item = res.images[0].src
  console.log(item)
  _that.houseTypeForm[index].imgUrl.unshift(item)
      }
     }
 })
   }
   },
   error(e) {
   console.log(e.message)
   }
  })
  },
/**
 * 打开图片查看器
 */
clickWatchImg(str, picIndex) {
console.log('=================')
console.log(picIndex)
console.log(this.$refs[str][picIndex])
this.$refs[str][picIndex].click()
},
 /**
 * 删除指定图片,操作表单数据
* @index 当前操作的户型box的索引
* @picIndex 当前操作的图片索引
*/
delHouseImage(index, picIndex) {
 this.houseTypeForm[index].imgUrl.splice(picIndex, 1)
},
关于vue.js组件的好代码教程,请大家点击专题vue.js组件学习好代码教程进行学习。
更多vue学习好代码教程请阅读专题《vue实战好代码教程》
到此这篇关于vue如何实现图片上传预览功能就介绍到这了。无论你有多少朋友,不能少了书这个诤友。更多相关vue如何实现图片上传预览功能内容请查看相关栏目,小编编辑不易,再次感谢大家的支持!


