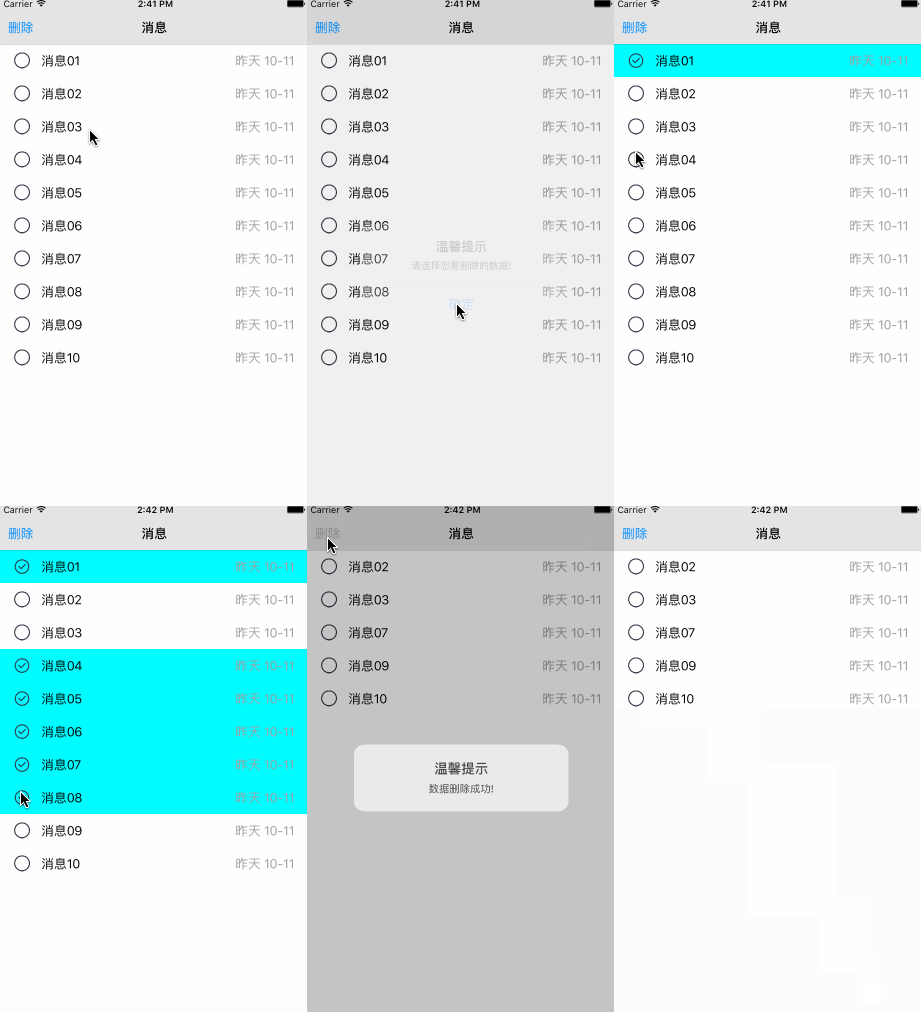
本文实例为大家分享了Swift实现表格视图单元格多选的具体代码,供大家参考,具体内容如下
效果
前言
这段时间比较忙,没太多的时间写博客,前段时间写了一些关于表格视图单选的文章,想着,一并把多选也做了,今天刚好有时间,去做这样一件事情。多选在我们的应用程序中也是常见的,比如消息的删除,群发联系人的选择,音乐的添加等等可能都会涉及到多选的需求,本文,我将模拟多选删除消息来讲讲多选的实现。
原理
多选删除其实很简单,并不复杂,我的思路就是创建一个数组,当用户选中某个单元格的时候,取到单元格上对应的数据,把它存入数组中,如果用户取消选中,直接将数据从数组中移除。当用户点击删除时,直接遍历数组,将表格视图数据源数组里面的与存选择数据的数组中的数据相对应一一删除,再刷新表格视图即可。
实现
界面搭建很简单,创建一个表格视图,添加导航栏,并在上面添加一个删除按钮,这里我就不细说了。
在ViewController 中,我们先声明几个属性,其中 selectedDatas 主要用于记录用户选择的数据。
var tableView: UITableView?
var dataSource: [String]?
var selectedDatas: [String]?
创建初始化方法,初始化属性,别忘了还需要在 ViewDidLoad()中调用方法初始化方法。
// MARK:Initialize methods
func initializeDatasource() {

    self.selectedDatas = []

    self.dataSource = []

    for index in 1...10 {
        index < 10 ? self.dataSource?.append("消息0\(index)") : self.dataSource?.append("消息\(index)")
    }
}

func initializeUserInterface() {

    self.title = "消息"
    self.automaticallyAdjustsScrollViewInsets = false

    // Add delete navigation item
    self.navigationItem.leftBarButtonItem = UIBarButtonItem(title: "删除", style: UIBarButtonItemStyle.Plain, target: self, action: Selector("respondsToBarButtonItem:"))

    // table view
    self.tableView = {
        let tableView = UITableView(frame: CGRectMake(0, 64, CGRectGetWidth(self.view.bounds), CGRectGetHeight(self.view.bounds)), style: UITableViewStyle.Plain)
        tableView.dataSource = self
        tableView.delegate = self
        tableView.tableFooterView = UIView()
        return tableView
        }()
    self.view.addSubview(self.tableView!)
}
此时,系统会报警告,提示你没有遵守协议,因为我们在初始化表格视图的时候为其设置了代理和数据源,遵守协议,并实现协议方法,配置数据源。
func numberOfSectionsInTableView(tableView: UITableView) -> Int {
    return 1
}

func tableView(tableView: UITableView, numberOfRowsInSection section: Int) -> Int {

    return self.dataSource!.count
}

func tableView(tableView: UITableView, cellForRowAtIndexPath indexPath: NSIndexPath) -> UITableViewCell {

    var cell: CustomTableViewCell? = tableView.dequeueReusableCellWithIdentifier("cellReuseIdentifier") as? CustomTableViewCell
    if cell == nil {
        cell = CustomTableViewCell(style: UITableViewCellStyle.Value1, reuseIdentifier: "cellReuseIdentifier")
    }

    cell!.selectionStyle = UITableViewCellSelectionStyle.None
    cell!.textLabel?.text = self.dataSource![indexPath.row]
    cell!.detailTextLabel?.text = "昨天 10-11"

    return cell!
}这里需要强调的是,表格视图的单元格是自定义的,在自定义单元格(CustomTableViewCell)中我只做了一个操作,就是根据单元格选中状态来切换图片的显示。
override func setSelected(selected: Bool, animated: Bool) {
    super.setSelected(selected, animated: animated)

    if selected {
        self.imageView?.image = UIImage(named: "iconfont-selected")
    }else {
        self.imageView?.image = UIImage(named: "iconfont-select")
    }
}
现在运行程序,界面已经显示出来了,下面我们将开始处理多选删除的逻辑,当我们点击单元格的时候发现,只能单选啊?我要怎么去多选呢?此时我们需要在配置表格视图的地方设置 allowsMultipleSelection 属性,将其值设为 YES。
tableView.allowsMultipleSelection = true
接下来,实现代理方法 didSelectRowAtIndexPath: 与 didDeselectRowAtIndexPath:,这里我们将修改单元格选中与未选中状态下的颜色,只需根据参数indexPath获取到单元格,修改 backgroundColor 属性,并且,我们还需要获取单元格上的数据,去操作selectedDatas数组,具体实现如下。
func tableView(tableView: UITableView, didSelectRowAtIndexPath indexPath: NSIndexPath) {

    let cell = tableView.cellForRowAtIndexPath(indexPath)
    cell?.backgroundColor = UIColor.cyanColor()

    self.selectedDatas?.append((cell!.textLabel?.text)!)

}

func tableView(tableView: UITableView, didDeselectRowAtIndexPath indexPath: NSIndexPath) {

    let cell = tableView.cellForRowAtIndexPath(indexPath)
    cell?.backgroundColor = UIColor.whiteColor()

    let index = self.selectedDatas?.indexOf((cell?.textLabel?.text)!)
    self.selectedDatas?.removeAtIndex(index!)
}
在 didDeselectRowAtIndexPath:方法中,我是根据表格视图单元格上的数据获取下标,再从数组中删除元素的,可能有的人会问,不能像OC一样调用removeObject:方法根据数据直接删除元素吗?并不能,因为Swift 提供的删除数组元素的方法中,大都是根据下标来删除数组元素的。
接下来,我们需要执行删除逻辑了,在删除按钮触发的方法中,我们要做的第一件事情就是异常处理,如果 selectedDatas 数组为空或者该数组并未初始化,我们无需再做删除处理,弹框提示即可。
// Exception handling
if (self.selectedDatas == nil) || (self.selectedDatas?.isEmpty == true) {
    let alertController = UIAlertController(title: "温馨提示", message: "请选择您要删除的数据!", preferredStyle: UIAlertControllerStyle.Alert)
    alertController.addAction(UIAlertAction(title: "确定", style: UIAlertActionStyle.Default, handler: nil))
    self.presentViewController(alertController, animated: true, completion: nil)
    return
}异常处理之后,我们需要遍历selectedDatas数组,然后根据该数组中的数据获取到该数据在数据源(dataSource)里的下标,最后再根据该下标将数据从数据源中删除。
for data in self.selectedDatas! {

    // Get index with data
    let index = self.dataSource!.indexOf(data)

    // Delete data with index
    self.dataSource?.removeAtIndex(index!)
}现在我们只需要刷新表格视图即可,当然,selectedDatas数组我们也需要清空,以备下一次用户多选删除使用。
self.tableView?.reloadData()

self.selectedDatas?.removeAll()
为了提高用户体验,我们可以弹框提示用户删除成功,直接在后面加上以下代码。
let alertController = UIAlertController(title: "温馨提示", message: "数据删除成功!", preferredStyle: UIAlertControllerStyle.Alert)

self.presentViewController(alertController, animated: true, completion: nil)


dispatch_after(dispatch_time(DISPATCH_TIME_NOW, Int64(1.0 * Double(NSEC_PER_SEC))), dispatch_get_main_queue()) { () -> Void in
    self.presentedViewController?.dismissViewControllerAnimated(true, completion: nil)
}代码中,我并未给弹出框添加action ,而是通过一个延迟调用,来让弹出框自动消失,这样就避免了用户再次点击弹出框按钮来隐藏,提升用户体验。
OK,到了这一步,基本已经实现了,但是有一个小瑕疵,那就是当我删除了单元格的时候,界面上某些单元格会呈现选中状态的背景颜色,解决办法非常简单,我们只需要在配置单元格的协议方法中加上这一句话即可。
cell?.backgroundColor = UIColor.whiteColor()
以上就是本文的全部内容,希望对大家的学习有所帮助,也希望大家多多支持好代码网。

