AutoUpdater.NET的原理大致是从服务器上(IIS站点)下载包含更新信息的XML文件,通过下载的XML文件获取Winform等桌面程序软件的最新版本的信息.如果最新版本的大于电脑上安装的版本,则 AutoUpdater.NET从XML文件中提供的URL下载更新文件(安装程序),如果XML文件中提供的URL提供的是包含zip后缀的URL而不是安装程序,则AutoUpdater.NET将zip文件的内容解压缩到应用程序目录。
1、xml文件
AutoUpdater.NET使用服务器网站上的XML文件获取有关软件最新版本的发布信息.需要创建如下XML文件,然后将其上传到服务器网站中
<?xml version="1.0" encoding="UTF-8"?>
<item>
  <version>2.0.0.0</version>
  <url>https://rbsoft.org/downloads/AutoUpdaterTest.zip</url>
  <changelog>https://github.com/ravibpatel/AutoUpdater.NET/releases</changelog>
  <mandatory>false</mandatory>
</item>
version(必填):桌面软件的版本 格式为X.X.X.X,AutoUpdater.NET是否执行更新依赖于该版本号
url(必填):桌面软件最新版本安装程序文件或zip文件的http(https)访问地址.
changelog(可选):记录变更日志的地址
mandatory (可选):true->强制用户升级软件 false->用户可以跳过升级
其余参数介绍查看官方文档.
2、实战
2.1、上传xml文件到指定站点
首先去iis选择一个站点作为AutoUpdater的xml文件的存放站点,用于和客户端进行通信.内容如下:
<?xml version="1.0" encoding="UTF-8"?>
<item>
  <version>3.0.0.0</version>
  <url>http://localhost/AutoUpdater/AutoUpdaterTest.zip</url>
  <changelog>http://localhost/AutoUpdater/changelog</changelog>
  <mandatory>false</mandatory>
</item>
2.2、桌面软件主程序集成AutoUpdater,帮助类如下
这里有几个注意点
(1)、AutoUpdater官方建议在从UI线程调用AutoUpdater.Start方法
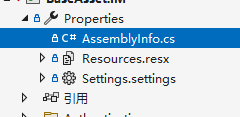
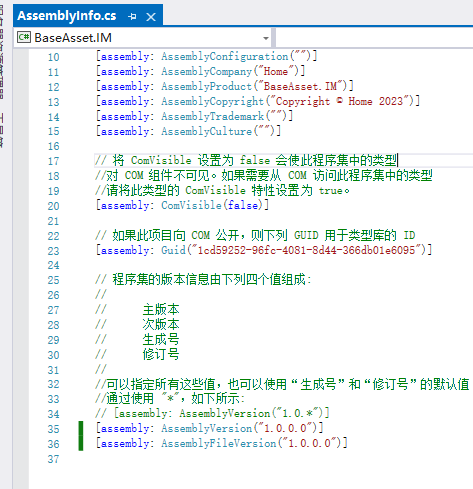
(2)、版本号的校验机制如果在AutoUpdater.Start(服务器xml地址,桌面软件主程序集),那么AutoUpdater会根据Properties下的AssemblyInfo中的版本信息和xml文件中的版本进行比较,判断是否需要升级
(3)、AutoUpdater的其余参数请参考文档
    public class AutoUpdator
    {
        public static void Start(string serverPath, ISynchronizeInvoke synchronizeInvoke)
        {
            #region 每隔三秒检查一次更新(判断依据是AssemblyInfo中的版本和xml文件的版本是否一致,如果服务器xml文件的版本大于AssemblyInfo中的版本则触发CheckForUpdateEvent)
            System.Timers.Timer timer = new System.Timers.Timer
            {
                Interval = 3 * 1000,
                SynchronizingObject = synchronizeInvoke
            };
            timer.Elapsed += (object sender, ElapsedEventArgs e) =>
            {
                AutoUpdater.Start(serverPath, Assembly.GetExecutingAssembly());
            };
            timer.Start();
            #endregion

            //若您不想在更新表单上显示“跳过”按钮,那个么只需在上面的代码中添加以下行即可。
            AutoUpdater.ShowSkipButton = false;

            //如果要同步检查更新,请在启动更新之前将Synchronous设置为true,如下所示。
            AutoUpdater.Synchronous = true;

            //若你们不想在更新表单上显示“以后提醒”按钮,那个么只需在上面的代码中添加以下一行即可。
            AutoUpdater.ShowRemindLaterButton = false;

            //如果要忽略先前设置的“以后提醒”和“跳过”设置,则可以将“强制”属性设置为true。它还将隐藏“跳过”和“稍后提醒”按钮。如果在代码中将强制设置为true,那么XML文件中的强制值将被忽略。
            AutoUpdater.Mandatory = false;

            //您可以通过添加以下代码来打开错误报告。如果执行此自动更新程序。NET将显示错误消息,如果没有可用的更新或无法从web服务器获取XML文件。
            AutoUpdater.ReportErrors = true;

            //如果服务器xml文件的版本大于AssemblyInfo中的版本则触发CheckForUpdateEvent
            AutoUpdater.CheckForUpdateEvent +=(args)=> {
                if (args.Error == null)
                {
                    //检测到有可用的更新
                    if (args.IsUpdateAvailable)
                    {
                        DialogResult dialogResult;
                        if (args.Mandatory.Value)
                        {
                            dialogResult =
                                MessageBox.Show(
                                    $@"当前有一个新版本{args.CurrentVersion}可用.你正在使用版本{args.InstalledVersion}.点击确认开始更新", @"更新可用",
                                    MessageBoxButtons.OK,
                                    MessageBoxIcon.Information);
                        }
                        else
                        {
                            dialogResult =
                                MessageBox.Show(
                                    $@"当前有一个新版本{args.CurrentVersion}可用.你正在使用版本{
                                            args.InstalledVersion
                                        }.确认要更新吗?", @"更新可用",
                                    MessageBoxButtons.YesNo,
                                    MessageBoxIcon.Information);
                        }

                        if (dialogResult.Equals(DialogResult.Yes) || dialogResult.Equals(DialogResult.OK))
                        {
                            try
                            {
                                //触发更新下载
                                if (AutoUpdater.DownloadUpdate(args))
                                {
                                    Application.Exit();
                                }
                            }
                            catch (Exception exception)
                            {
                                MessageBox.Show(exception.Message, exception.GetType().ToString(), MessageBoxButtons.OK,
                                    MessageBoxIcon.Error);
                            }
                        }
                    }
                }
                else
                {
                    if (args.Error is WebException)
                    {
                        MessageBox.Show(
                            @"连接更新服务器失败,请检查网络连接.",
                            @"更新检查失败", MessageBoxButtons.OK, MessageBoxIcon.Error);
                    }
                    else
                    {
                        MessageBox.Show(args.Error.Message,
                            args.Error.GetType().ToString(), MessageBoxButtons.OK,
                            MessageBoxIcon.Error);
                    }
                }
            };
        }
    }
3、注意
如果走的是自定义安装,这里右键项目属性,通过修改发布的版本号,如下图

这种方式不适用,主程序集的版本号不会发生改变.所以,这里需要通过修改主程序集的AssemblyInfo中的版本才能使版本生效
