redis-cli 是Redis命令行界面,一个简单的程序,允许直接从终端向Redis发送命令,并读取服务器发送的回复。
- redis数据库对命令大小写不敏感,ping、Ping、PING是同一个命令
- redis数据库对变量大小写敏感,A、a是两个变量
两种模式
它有两种主要模式:
- 一种交互模式,其中有一个 REPL(读取评估打印循环),用户可以在其中键入命令并获得回复;
- 另一种模式,其中命令作为 的参数发送redis-cli、执行并打印在标准输出上
在交互模式下,redis-cli具有基本的行编辑功能,提供良好的打字体验。
命令行使用
方法:
$ redis-cli incr mycounter
(integer) 7
命令的回复是“7”。由于 Redis 回复是类型化的(它们可以是字符串、数组、整数、NULL、错误等),您会在括号中看到回复的类型。
然而,当redis-cli必须将的输出用作另一个命令的输入时,或者当我们想要将其重定向到文件时,这并不是一个好主意。
实际上redis-cli只显示附加信息,当它检测到标准输出是一个 tty(基本上是一个终端)时,可以提高人类的可读性。否则它将自动启用原始输出模式,如方法2所示
方法2
$ redis-cli incr mycounter > /tmp/output.txt
$ cat /tmp/output.txt
8
(integer)由于 CLI 检测到输出不再写入终端,因此输出中省略了该时间。您甚至可以使用以下–raw选项在终端上强制原始输出,如方法3所示
方法3
$ redis-cli --raw incr mycounter
9
类似地,您可以使用–no-raw.
主机、端口、密码和数据库
- 默认情况下redis-cli,通过127.0.0.1 端口 6379 连接到服务器。
- 可以使用命令行选项轻松更改此设置。要指定不同的主机名或 IP 地址,请使用-h. 要设置不同的端口,请使用-p.
$ redis-cli -h redis15.localnet.org -p 6390 ping
PONG
- 如果您的实例受密码保护,该
-a <password>选项将执行身份验证,从而无需显式使用AUTH命令:
$ redis-cli -a myUnguessablePazzzzzword123 ping
PONG
- 最后,可以使用以下
-n <dbnum>选项发送对数据库编号而不是默认编号零进行操作的命令:
$ redis-cli flushall
OK
$ redis-cli -n 1 incr a
(integer) 1
$ redis-cli -n 1 incr a
(integer) 2
$ redis-cli -n 2 incr a
(integer) 1
- 也可以通过使用
-u <uri>选项和有效的 URI来提供部分或全部信息:
$ redis-cli -u redis://p%40ssw0rd@redis-16379.hosted.com:16379/0 ping
PONG
连续运行相同的命令
可以在用户选择的两次执行之间暂停的情况下,将同一命令执行指定的次数
-r <count>:运行命令的次数-i <delay>:- 每隔几秒运行一次命令。
- 默认情况下,间隔(或延迟)设置为 0,因此命令会尽快执行
- 注意:-i的单位是秒,不支持毫秒,如果想每隔10毫秒执行一次,可以用-i 0.01
示例:对foo自增5次
$ redis-cli -r 5 incr foo
(integer) 1
(integer) 2
(integer) 3
(integer) 4
(integer) 5
示例:执行三次ping
bogon:~ ww$ redis-cli -r 3 ping
PONG
PONG
PONG
bogon:~ ww$
示例:每隔1秒执行一次ping,执行五次
bogon:~ ww$ redis-cli -r 5 -i 1 ping
PONG
PONG
PONG
PONG
PONG
bogon:~ ww$
示例
要永远运行相同的命令,请使用-1作为 count。因此,为了随时间监控 RSS 内存大小,可以使用如下命令:
$ redis-cli -r -1 -i 1 INFO | grep rss_human
used_memory_rss_human:1.38M
used_memory_rss_human:1.38M
used_memory_rss_human:1.38M
... a new line will be printed each second ...
CSV 输出
有时您可能希望使用redis-cli以快速将数据从 Redis 导出到外部程序。这可以使用 CSV(逗号分隔值)输出功能来完成:
$ redis-cli lpush mylist a b c d
(integer) 4
$ redis-cli --csv lrange mylist 0 -1
"d","c","b","a"
目前不可能像那样导出整个数据库,而只能运行带有 CSV 输出的单个命令。
交互模式
在交互模式下,用户在提示符下键入 Redis 命令。命令被发送到服务器,进行处理,回复被解析并呈现为更简单的形式以供阅读。
启动
在交互模式下运行 CLI 不需要什么特别的东西 - 只需启动它而不带任何参数,你就在:
$ redis-cli
127.0.0.1:6379> ping
PONG
字符串127.0.0.1:6379>是提示。它提醒您已连接到给定的 Redis 实例。
当您连接到的服务器发生变化时,或者当您在数据库编号为零的数据库上进行操作时,提示会发生变化:
127.0.0.1:6379> select 2
OK
127.0.0.1:6379[2]> dbsize
(integer) 1
127.0.0.1:6379[2]> select 0
OK
127.0.0.1:6379> dbsize
(integer) 503
处理连接和重新连接
connect通过指定我们要连接的主机名和端口,在交互模式下使用该命令可以连接到不同的实例:
127.0.0.1:6379> connect metal 6379
metal:6379> ping
PONG
如您所见,提示会相应更改。如果用户尝试连接到无法访问的实例,则会redis-cli进入断开连接模式并尝试使用每个新命令重新连接:
127.0.0.1:6379> connect 127.0.0.1 9999
Could not connect to Redis at 127.0.0.1:9999: Connection refused
not connected> ping
Could not connect to Redis at 127.0.0.1:9999: Connection refused
not connected> ping
Could not connect to Redis at 127.0.0.1:9999: Connection refused
通常在检测到断开连接后,CLI 总是会尝试透明地重新连接:如果尝试失败,则显示错误并进入断开连接状态。以下是断开和重新连接的示例:
127.0.0.1:6379> debug restart
Could not connect to Redis at 127.0.0.1:6379: Connection refused
not connected> ping
PONG
127.0.0.1:6379> (now we are connected again)
执行重新连接时,redis-cli自动重新选择上次选择的数据库编号。但是,连接的所有其他状态都将丢失,例如处于事务中间的事务状态:
$ redis-cli
127.0.0.1:6379> multi
OK
127.0.0.1:6379> ping
QUEUED

( here the server is manually restarted )

127.0.0.1:6379> exec
(error) ERR EXEC without MULTI
在交互模式下使用 CLI 进行测试时,这通常不是问题,但您应该了解此限制。
运行相同的命令 N 次
通过在命令名称前加上一个数字,可以多次运行相同的命令:
127.0.0.1:6379> 5 incr mycounter
(integer) 1
(integer) 2
(integer) 3
(integer) 4
(integer) 5
清除终端屏幕
clear在交互模式下使用该命令会清除终端的屏幕。
特殊操作模式
-x
- –x选项代表从标准输入(stdin)读取数据作为redis-cli的最后一个参数,一般与管道符在一起使用。
[root@Redis ~]# echo dbsize|redis-cli -x
(integer) 14
例如下面的操作会将字符串world作为set hello的值:

–stat:连续统计模式
–stat选项可以实时获取redis的重要统计信息,虽然info命令中的统计信息更全,但是能实时看到一些增量的数据对redis的运维还是有一些帮助的
$ redis-cli --stat
------- data ------ --------------------- load -------------------- - child -
keys       mem      clients blocked requests            connections
506        1015.00K 1       0       24 (+0)             7
506        1015.00K 1       0       25 (+1)             7
506        3.40M    51      0       60461 (+60436)      57
506        3.40M    51      0       146425 (+85964)     107
507        3.40M    51      0       233844 (+87419)     157
507        3.40M    51      0       321715 (+87871)     207
508        3.40M    51      0       408642 (+86927)     257
508        3.40M    51      0       497038 (+88396)     257
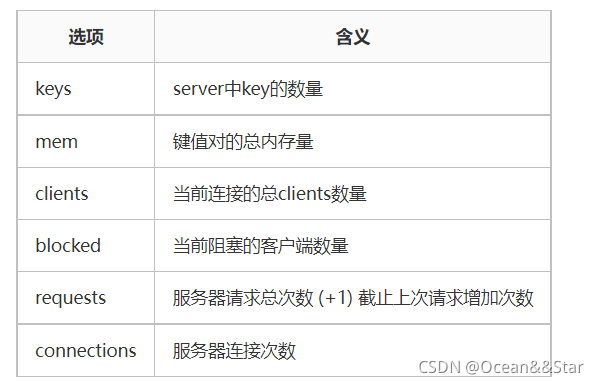
在这种模式下,每秒钟都会打印一条新行,其中包含有用信息和旧数据点之间的差异。您可以轻松了解内存使用情况、客户端连接等情况。
-i <interval>在这种情况下,该选项用作修改器,以更改发出新行的频率。默认值为一秒。
-hotkeys:找出server中热点key 命令
# Scanning the entire keyspace to find hot keys as well as
# average sizes per key type.  You can use -i 0.1 to sleep 0.1 sec
# per 100 SCAN commands (not usually needed).

[00.00%] Hot key 'dd' found so far with counter 4
[00.00%] Hot key 'myset' found so far with counter 5
[00.00%] Hot key 'a' found so far with counter 5
[00.00%] Hot key 'dds' found so far with counter 4
[71.43%] Hot key 'aa' found so far with counter 4
[71.43%] Hot key 'key' found so far with counter 4

-------- summary -------

Sampled 14 keys in the keyspace!
hot key found with counter: 5	keyname: myset
hot key found with counter: 5	keyname: a
hot key found with counter: 4	keyname: dd
hot key found with counter: 4	keyname: dds
hot key found with counter: 4	keyname: aa
hot key found with counter: 4	keyname: key
–bigkeys:扫描大键
--bigkeys选项使用scan命令对redis的键进行采样,从中找到内存占用较大的键值,这些键可能是系统的瓶颈
$ redis-cli --bigkeys

# Scanning the entire keyspace to find biggest keys as well as
# average sizes per key type.  You can use -i 0.1 to sleep 0.1 sec
# per 100 SCAN commands (not usually needed).

[00.00%] Biggest string found so far 'key-419' with 3 bytes
[05.14%] Biggest list   found so far 'mylist' with 100004 items
[35.77%] Biggest string found so far 'counter:__rand_int__' with 6 bytes
[73.91%] Biggest hash   found so far 'myobject' with 3 fields

-------- summary -------

Sampled 506 keys in the keyspace!
Total key length in bytes is 3452 (avg len 6.82)

Biggest string found 'counter:__rand_int__' has 6 bytes
Biggest   list found 'mylist' has 100004 items
Biggest   hash found 'myobject' has 3 fields

504 strings with 1403 bytes (99.60% of keys, avg size 2.78)
1 lists with 100004 items (00.20% of keys, avg size 100004.00)
0 sets with 0 members (00.00% of keys, avg size 0.00)
1 hashs with 3 fields (00.20% of keys, avg size 3.00)
0 zsets with 0 members (00.00% of keys, avg size 0.00)
–scan:扫描指定模式的键
- 此模式与该–bigkeys选项一样,使用SCAN命令
- 因此如果数据集发生变化,可能会多次报告键,但如果自迭代开始以来该键就存在,则不会丢失任何键
$ redis-cli --scan | head -10
key-419
key-71
key-236
key-50
key-38
key-458
key-453
key-499
key-446
key-371
请注意,head -10用于仅打印输出的第一行。
扫描能够使用带有选项的SCAN命令的底层模式匹配功能–pattern。
$ redis-cli --scan --pattern '*-11*'
key-114
key-117
key-118
key-113
key-115
key-112
key-119
key-11
key-111
key-110
key-116
通过wc命令管道输出可用于按键名计算特定类型的对象:
$ redis-cli --scan --pattern 'user:*' | wc -l
3829433
监控Redis实例的延迟
redis通常用于延迟非常关键的环境中。延迟涉及应用程序的多个移动部分,从客户端库到网络堆栈,再到redis实例本身
–latency
- 测试客户端到目标Redis的网络延迟
实例
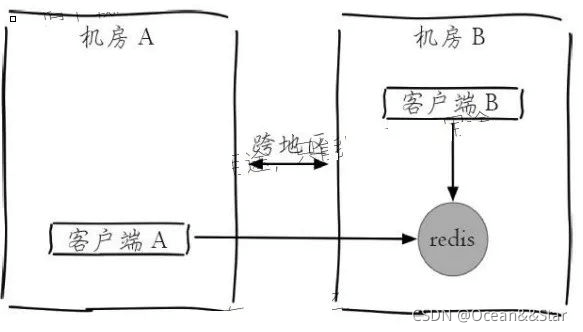
例如当前拓扑结构如下图所示。客户端B和Redis在机房B,客户端A在机房A,机房A和机房B是跨地区的
客户端B:
[root@Redis ~]# redis-cli --latency
min: 0, max: 1, avg: 0.07 (824 samples)
客户端A:
[root@chenxing2 redis]# redis-cli -h 192.168.71.135 --latency
min: 0, max: 1, avg: 0.33 (113 samples)
可以看到客户端A由于距离Redis比较远,平均网络延迟会稍微高一些
–latency-history
–latency的执行结果只有一条,如果想以分时段的形式了解延迟信息,可以使用 --latency-history 选项:
redis-cli -h 127.0.0.1 -p 6379 --latency-history
min: 0, max: 2, avg: 0.27 (1301 samples) -- 15.01 seconds range
min: 0, max: 2, avg: 0.27 (1301 samples) -- 15.00 seconds range
.
.
.
min: 0, max: 1, avg: 0.28 (1308 samples) -- 15.00 seconds range
可以看出,每15秒输出一次,可以通过-i参数控制时间间隔,比如:
[root@chenxing2 redis]#  redis-cli -h 127.0.0.1 -p 6379 --latency-history -i 1  //一秒输出一次
min: 0, max: 1, avg: 0.27 (92 samples) -- 1.00 seconds range
min: 0, max: 1, avg: 0.23 (91 samples) -- 1.00 seconds range
–latency-dist
- 该选项会使用统计图表的形式从控制台输出延迟统计信息
$ redis-cli --latency-dist
(output not displayed, requires a color terminal, try it!)
–rdb:导入rdb文件
root@hylaz:~# redis-cli --rdb rdb.log
SYNC sent to master, writing 344 bytes to 'rdb.log'
Transfer finished with success.
该命令选项实现:
- 向server发送SYNC命令,返回需要写的总字节数
- 从server读取总字节数据写到指定文件中
–slave:从机模式
–slave选项是把当前客户端模拟成当前redis节点的从节点,可以用来获当前redis节点的更新操作
合理的利用这个选项可以记录当前连接Redis节点的更新操作,这些更新操作可能是实际开发业务时需要的数据。
第一个客户端使用–slave选项,可以看到它会一直处于等待状态:
[root@Redis ~]# redis-cli --slave
SYNC with master, discarding 1765 bytes of bulk transfer...
SYNC done. Logging commands from master.
"PING"
另外一些客户端进行一些数据的操作:
127.0.0.1:6379> set zj sb
OK
127.0.0.1:6379> del zj
(integer) 1
设置–slave选项的客户端会出现这些操作的指示:
[root@Redis ~]# redis-cli --slave
SYNC with master, discarding 1765 bytes of bulk transfer...
SYNC done. Logging commands from master.
"PING"
"PING"
"PING"
"PING"
"PING"
"SELECT","0"
"set","zj","sb"
"PING"
"PING"
"del","zj"
–pipe
–pipe选项用于将命令封装成Redis通信协议定义的数据格式,批量发送给Redis执行。
–raw和–no-raw
–no-raw选项是要求命令的返回结果必须是原始的格式,–raw恰恰相反,返回格式化后的结果。
在Redis中设置一个键,如果用get或–no-row选项,那么返回的结果是二进制格式:
[root@Redis ~]# redis-cli set hello "你好"
OK
[root@Redis ~]# redis-cli get hello
"\xe4\xbd\xa0\xe5\xa5\xbd"
[root@Redis ~]# redis-cli --no-raw get hello
"\xe4\xbd\xa0\xe5\xa5\xbd"
如果使用–raw选项,就会返回中文:
[root@Redis ~]# redis-cli --raw get hello
你好
到此这篇关于redis中redis-cli使用小结的文章就介绍到这了,更多相关redis-cli使用内容请搜索好代码网以前的文章或继续浏览下面的相关文章希望大家以后多多支持好代码网!


