1,页面目录信息:
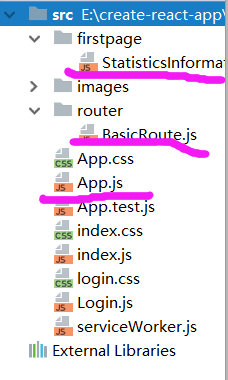
2,从index.js导入路由信息BasicRoute.js,然后BasicRoute.js中存储App.js和StatisticsInformation.js页面信息,从App.js登录成功后跳转到StatisticsInformation.js页面。
3,index.js略
4,BasicRoute.js
import React from 'react';
import {HashRouter, Route, Switch,hashHistory} from 'react-router-dom';       //导入react-router-dom组件
import App from '../App';                                                     //导入页面
import StatisticsInformation from '../firstpage/StatisticsInformation';       //导入页面
import createBrowserHistory from "history/createBrowserHistory";              //导入history包
const customHistory = createBrowserHistory();                                 //创建
const BasicRoute = () => (
        <HashRouter history={customHistory}>    //给路由添加属性history,这样父组件就可以调用this.props.history.push
        <Switch>
            <Route exact path="/" component={App}/>   //注册组件
            <Route exact path="/firstpage/StatisticsInformation" component={StatisticsInformation}/>   //注册组件
        </Switch>
      </HashRouter>
);
export default BasicRoute;
5, App.js页面:
export  default  class  App  extends   React.Component{
 render(){
        return (
            <div className="back">
              <Login  history={this.props.history} url='http://www.baidu.com' />  //将this.props.history作为属性传递给子组件Login。因为子组件不具备history属性。
            </div>
        );}}
6,Login.js页面进行登录验证,验证函数也在这里,实现校验成功后跳转:
class Login   extends   React.Component{
     submitFun(username,password){            //登录验证函数
  var  newpage = this.props.newpage;          //跳转的目标页面
 this.props.history.push(newpage);          //实现跳转
         } ;

 render(){
      return(
         <Form  onSubmit={(username,password)=>this.submitFun(username,password)} >   //登录的时候触发函数
        </Form>
       ) }
}
7,哦,别忘了:
npm  install  react-router-dom
npm  intall   history
到此这篇关于react.js实现页面登录跳转示例的文章就介绍到这了,更多相关react.js登录跳转内容请搜索好代码网以前的文章或继续浏览下面的相关文章希望大家以后多多支持好代码网!

