SuperText富文本设计方案
Flutter中要实现富文本,需要使用RichText或者Text.rich方法,通过拆分成List<InlineSpan>来实现,第一感觉上好像还行,但实际使用了才知道,有一个很大的问题就是对于复杂的富文本效果,无法准确拆分出具有实际效果的spans。因此想设计一个具有多种富文本效果,同时便于使用的富文本控件SuperText。
RichText原理
Flutter中的InlineSpan其实是Tree的结构。例如一段md样式的文字:
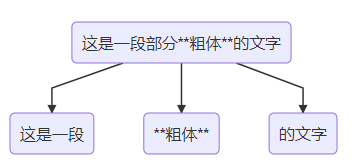
其实就是被拆分了3段TextSpan,然后下面绘制的时候,就会使用ParagraphBuilder分别访问这3个节点,3个节点分别往ParagraphBuilder中填充对应的文字以及样式。
那么是否这个树的深度一定只有2层?
这个未必,如果一开始就解析拆分出所有的富文本效果,那么可能就只有2层,但实际上就算是多层,也是没有问题的,例如:
这是一段粗体并且部分带着斜体效果的文字
可以拆分成如下:
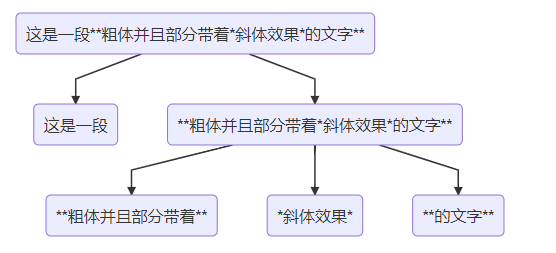
需要注意的是TextSpan中有两个参数,一个是text,一个是children。这两个参数是同时生效的, 先用TextSpan中的style和structstyle显示text,然后再接着显示children。例如:
Text.rich(
    TextSpan(
        text: '123456',
        children: [
                    TextSpan(
                        text: 'abcdefg',
                        style: TextStyle(color: Colors.blue),
                    ),
                  ]
    ),
)最终显示的效果是123456abcdefg,其中abcdefg是蓝色的。
方案设计
了解了富文本的原理后,封装控件需要实现的目标就确定了,那就是
自动将文本text,转换成inlineSpan组成的树
然后丢给Text控件去显示。
那么如何去实现这个转化的过程?我的想法是依次遍历节点,然后衍生出新的节点,最终由叶子节点组成最终的显示效果。
我们以包含自定义表情和##标签的效果为例子。
#一个[表情]的标签#哈哈哈哈哈
首先初始状态只有文本text的情况下,可以认为是一个树的根节点,里面存在文本text。我们可以先把标签解析出来,那么就能从这个根节点,拆分出2个节点:
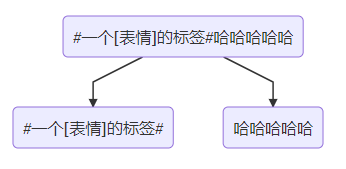
然后再将两个叶子节点解析自定义表情:
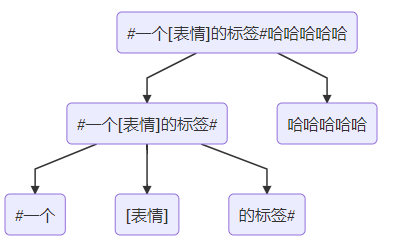
最终得到4个叶子节点,最终生成的InlineSpan,应该如下:
TextSpan(
    children: [
        TextSpan(
            style: TextStyle(color: Colors.blue),
            children: [
                TextSpan(
                    text: '#一个',
                ),
                WidgetSpan(
                    child: Image.asset(),
                ),
                TextSpan(
                    text: '的标签#',
                ),
            ],
        ),
         TextSpan(
            text: '哈哈哈哈哈',
            style: TextStyle(color: Colors.black),
        ),
    ],
),
上述过程,涉及到三点:1. 遍历;2. 解析拆分;3. 生成节点。等到了最终所有叶子结点都无法再被拆分出新节点时,这颗InlineSpan树就是最终的解析结果。
解析
如何进行解析。像Emoji表情或者http链接那种,一般都是使用正则便能识别出来,而更加简单的变颜色、改字体大小这种,在Android上都是直接通过设置起始位置和结束位置来标明范围的,我们也可以使用这种简单好理解的方式来实现,所以解析的时候,需要能够拿到待解析内容在原始文本中的位置。例如原文“一个需要放大的字”,已经被其他解析器分成了两段“一个需要”和“放大的字”,在斜体解析器解析“放大的字”的时候,需要知道原文第5到第6个字需要变成斜体,在把这5->6转变成相对于“放大的字”这一段而言的第1到第2个字。
代码设计
方案理解了之后,就开始简单的框架编写。
节点定义
按照树结构,定义一个Node
class TextNode {
  ///该节点文本
  String text;
  TextStyle style;
  late InlineSpan span;

  ///该节点文本,在原始文本中的开始位置。include
  int startPosInOri;

  ///该节点文本,在原始文本中的结束位置。include
  int endPosInOri;

  List<TextNode>? subNodes;

  TextNode(this.text, this.style,
      {required this.startPosInOri, required this.endPosInOri});
}
Span构造器定义
abstract class BaseSpanBuilder {

  bool isSupport(TextNode node);

  ///
  /// 解析生成子节点
  ///
  List<TextNode> parse(TextNode node);
}
SuperText定义
先作为一个简单版的Text控件,接收text、TextStyle和构造器列表即可。
class SuperText extends StatefulWidget {
  final String text;
  final TextStyle style;
  final List<BaseSpanBuilder>? spanBuilders;

  const SuperText(
    this.text, {
    Key? key,
    required this.style,
    this.spanBuilders,
  }) : super(key: key);

  @override
  State<StatefulWidget> createState() {
    return _SuperTextState();
  }
}对应的build()方法:
  late InlineSpan _textSpan;

  @override
  Widget build(BuildContext context) {
    return Text.rich(
      _textSpan,
      style: widget.style,
    );
}之后需要做的事就是把传入的text解析成_textSpan即可。
  InlineSpan _buildSpans() {
    if (widget.spanBuilders?.isEmpty ?? true) {
      return TextSpan(text: widget.text, style: widget.style);
    } else {
      //准备根节点
      TextNode rootNode = TextNode(widget.text, widget.style,
          startPosInOri: 0, endPosInOri: widget.text.length - 1);
      rootNode.span = TextSpan(text: widget.text, style: widget.style);
      //开始生成子节点
      _generateNodes(rootNode, 0);
      //深度优先遍历,生成最终的inlineSpan
      List<InlineSpan> children = [];
      dfs(rootNode, children);
      return TextSpan(children: children, style: widget.style);
    }
  }

  void _generateNodes(TextNode node, int builderIndex) {
    BaseSpanBuilder spanBuilder = widget.spanBuilders![builderIndex];
    if (spanBuilder.isSupport(node)) {
      List<TextNode> subNodes = spanBuilder.parse(node);
      node.subNodes = subNodes.isEmpty ? null : subNodes;
      if (builderIndex + 1 < widget.spanBuilders!.length) {
        if (subNodes.isNotEmpty) {
          //生成了子节点,那么把子节点抛给下个span构造器
          for (TextNode n in subNodes) {
            _generateNodes(n, builderIndex + 1);
          }
        } else {
          //没有子节点,说明当前的span构造器不处理当前的节点内容,那么把当前的节点抛给下个span构造器
          _generateNodes(node, builderIndex + 1);
        }
      }
    }
  }

  ///
  /// 深度优先遍历,构建最终的List<InlineSpan>
  ///
  void dfs(TextNode node, List<InlineSpan> children) {
    if (node.subNodes?.isEmpty ?? true) {
      children.add(node.span);
    } else {
      for (TextNode n in node.subNodes!) {
        dfs(n, children);
      }
    }
}实现逻辑基本就是方案设计中的想法。
可以修改TextStyle的Span构造器
舞台准备好了,那个要训练演员了。这里编写一个TextStyleSpanBuilder,用于接受TextStyle作为富文本样式:
class TextStyleSpanBuilder extends BaseSpanBuilder {
  final int startPos;
  final int endPos;
  final Color? textColor;
  final double? fontSize;
  final FontWeight? fontWeight;
  final Color? backgroundColor;
  final TextDecoration? decoration;
  final Color? decorationColor;
  final TextDecorationStyle? decorationStyle;
  final double? decorationThickness;
  final String? fontFamily;
  final double? height;
  final List<Shadow>? shadows;

  TextStyleSpanBuilder(
      this.startPos,
      this.endPos, {
        this.textColor,
        this.fontSize,
        this.fontWeight,
        this.backgroundColor,
        this.decoration,
        this.decorationColor,
        this.decorationStyle,
        this.decorationThickness,
        this.fontFamily,
        this.height,
        this.shadows,
      }) : assert(startPos >= 0 && startPos <= endPos);

  @override
  List<TextNode> parse(TextNode node) {
    List<TextNode> result = [];
    if (startPos > node.endPosInOri || endPos < node.startPosInOri) {
      return result;
    }

    if (startPos >= node.startPosInOri) {
      //富文本开始位置,在这段文字之内
      if (startPos > node.startPosInOri) {
        int endRelative = startPos - node.startPosInOri;
        String subText = node.text.substring(0, endRelative);
        TextNode subNode = TextNode(
          subText,
          node.style,
          startPosInOri: node.startPosInOri,
          endPosInOri: startPos - 1,
        );
        subNode.span = TextSpan(text: subNode.text, style: subNode.style);
        result.add(subNode);
      }

      //富文本在这段文字的开始位置
      int startRelative = startPos - node.startPosInOri;
      int endRelative;
      String subText;
      TextStyle textStyle;

      if (endPos <= node.endPosInOri) {
        //结束位置在这段文字内
        endRelative = startRelative + (endPos - startPos);
      } else {
        //结束位置,超出了这段文字。将开始到这段文字结束,都包含进富文本去
        endRelative = node.endPosInOri - node.startPosInOri;
      }

      subText = node.text.substring(startRelative, endRelative + 1);
      textStyle = copyStyle(node.style);
      TextNode subNode = TextNode(
        subText,
        textStyle,
        startPosInOri: node.startPosInOri + startRelative,
        endPosInOri: node.startPosInOri + endRelative,
      );
      subNode.span = TextSpan(text: subNode.text, style: subNode.style);
      result.add(subNode);

      if (endPos < node.endPosInOri) {
        //还有剩下的一段
        startRelative = endPos - node.startPosInOri + 1;
        endRelative = node.endPosInOri - node.startPosInOri;
        subText = node.text.substring(startRelative, endRelative + 1);
        TextNode subNode = TextNode(
          subText,
          node.style,
          startPosInOri: endPos + 1,
          endPosInOri: node.endPosInOri,
        );
        subNode.span = TextSpan(text: subNode.text, style: subNode.style);
        result.add(subNode);
      }
    } else {
      //富文本开始位置不在这段文字之内,那就检查富文本结尾的位置,是否在这段文字内
      if (node.startPosInOri <= endPos) {
        int startRelative = 0;
        int endRelative;
        String subText;
        TextStyle textStyle;

        if (endPos <= node.endPosInOri) {
          //富文本结尾位置,在这段文字内
          endRelative = endPos - node.startPosInOri;
        } else {
          //富文本结尾位置,超过了这段文字
          endRelative = node.endPosInOri - node.startPosInOri;
        }
        subText = node.text.substring(startRelative, endRelative + 1);
        textStyle = copyStyle(node.style);
        TextNode subNode = TextNode(
          subText,
          textStyle,
          startPosInOri: node.startPosInOri + startRelative,
          endPosInOri: node.startPosInOri + endRelative,
        );
        subNode.span = TextSpan(text: subNode.text, style: subNode.style);
        result.add(subNode);

        if (endPos < node.endPosInOri) {
          //还有剩下的一段
          startRelative = endPos - node.startPosInOri + 1;
          endRelative = node.endPosInOri - node.startPosInOri;
          subText = node.text.substring(startRelative, endRelative + 1);
          TextNode subNode = TextNode(
            subText,
            node.style,
            startPosInOri: endPos + 1,
            endPosInOri: node.endPosInOri,
          );
          subNode.span = TextSpan(text: subNode.text, style: subNode.style);
          result.add(subNode);
        }
      }
    }
    return result;
  }

  TextStyle copyStyle(TextStyle style) {
    return style.copyWith(
      color: textColor,
      fontSize: fontSize,
      fontWeight: fontWeight,
      backgroundColor: backgroundColor,
      decoration: decoration,
      decorationColor: decorationColor,
      decorationStyle: decorationStyle,
      decorationThickness: decorationThickness,
      fontFamily: fontFamily,
      height: height,
      shadows: shadows,
    );
  }

  @override
  bool isSupport(TextNode node) {
    return node.span is EmojiSpan || node.span is TextSpan;
  }
}parse方法在做的事,就是将一个TextNode拆分成多段的TextNode。
效果展示
SuperText(
            '0123456789',
            style: const TextStyle(color: Colors.red, fontSize: 16),
            spanBuilders: [
              TextStyleSpanBuilder(2, 6, textColor: Colors.blue),
              TextStyleSpanBuilder(4, 7, fontSize: 40),
              TextStyleSpanBuilder(6, 9, backgroundColor: Colors.green),
              TextStyleSpanBuilder(1, 1, decoration: TextDecoration.underline),
            ],
          )
效果如图:

这个用法,好像和原来的也没啥差别啊。其实不然,首先多个效果之间可以交叉重叠,另外这里展示的是基本的使用TextStyle实现的富文本效果。如果是那种需要依靠正则解析拆分后实现的富文本效果,例如自定义表情,只需要一个EmojiSpanBuilder()即可。
结语
按照这个方案,对于不同的富文本效果,只需要定制不同的spanBuilder就可以了,使用方法非常类似于Android的SpannableStringBuilder。
以上就是Flutter实现编写富文本Text的示例代码的详细内容,更多关于Flutter富文本的资料请关注好代码网其它相关文章!

