摘要
directive(指令)是angular的一个非常强大又有用的功能,它相当于实现了组件化的概念。我们可以通过它公共地自定义DOM元素或CLASS类或ATTR属性,并且在这基础上进行操作scope、绑定事件等等。将一些公共的模块或操作封装到指令中,然后就可以在html页面中编写简单的一行代码就可以加载整个公共模块,大大避免了代码的冗余。一般使用directive有以下场景:
- 使html更具有语义化,不需要深入研究和了解逻辑即可知道页面的大致逻辑;
- 抽象出一个自定义的组件,以便在其他地方可以进行复用。
下面我想通过一些实例结合分析对我所了解的directive进行一些简单的归纳总结(我所使用的是angular1.5.3):
一、Directive的使用
angular.module("app",[]).directive("directiveName",function(){
return{
//通过设置项来定义
};
})
二、一个简单的实例
html代码:
<!DOCTYPE html>
<html ng-app='helloApp'>
 <body>
  <hello></hello>
 </body>

 <script src="js/angular.min.js"></script>
 <script src="js/helloDirective.js"></script>
</html>
js代码:
var appModule = angular.module('helloApp', []);
appModule.directive('hello', function() {
 return {
  restrict: 'E',
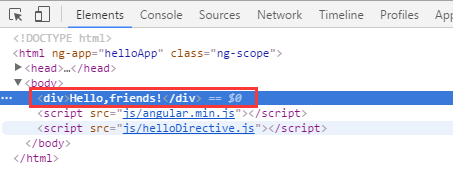
  template: '<div>Hello,friends!</div>',
  replace: true
 };
});
效果截图:

实例解析:
1、restrict:EACM的子集的字符串,它限制directive为指定的声明方式。
- E - 元素名称: <my-directive></my-directive>
- A - 属性名:<div my-directive=”exp”></div>
- C - class名: <div class=”my-directive:exp;”></div>
- M - 注释 : <!-- directive: my-directive exp -->
2、默认情况下,directive将仅仅允许通过属性声明,ECA较常用。
template:指令显示的模板内容,一般由html标签和文本组成。通常情况下html内容较简单的情况下使用,模板内容复杂的建议将公共部分抽离到html文件中,使用templateUrl属性。
templateUrl - 与template基本一致,但模版通过指定的url进行加载。因为模版加载是异步的,所以compilation、linking都会暂停,等待加载完毕后再执行。
3、replace:如果设置为true,那么模版将会替换当前元素,而不是作为子元素添加到当前元素中。(注:为true时,模版必须有一个根节点)
上述实例dom节点截图:
三、实例2:关于transclude
修改上面实例代码:
<!DOCTYPE html>
<html ng-app='helloApp' ng-controller="myController">
 <body>
  <hello>{{myName}}</hello>
 </body>

 <script src="js/angular.min.js"></script>
 <script src="js/helloDirective.js"></script>
</html>
var appModule = angular.module('helloApp', []);
appModule.directive('hello', function() {
 return {
  restrict: 'E',
  template: '<div>Hello,my name is <span ng-transclude></span></div>',
  replace: true,
  transclude:true
 };
});
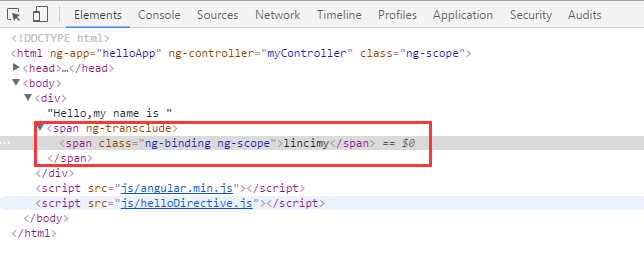
效果截图:

解析:
transclude:指令的作用是把我们自定义的语义化标签替换成浏览器能够认识的HTML标签。上述例子replace设置为true,模版将会替换当前元素。而transclude设置为true的作用可以简化地理解成:把<hello>标签替换成我们所编写的HTML模板,但是<hello>标签内部的内容保持不变。而<span ng-transclude></span>则是指明标签内部内容插入到模板内容的哪个位置。
四、实例3:关于compile,link和controller
实例代码:
phonecatDirectives.directive('exampleDirective', function() {
 return {
  restrict: 'E',
  template: '<p>Hello {{number}}!</p>',
  controller: function($scope, $element){
   $scope.number = $scope.number + "22222 ";
  },
  link: function(scope, el, attr) {
   scope.number = scope.number + "33333 ";
  },
  compile: function(element, attributes) {
   return {
    pre: function preLink(scope, element, attributes) {
     scope.number = scope.number + "44444 ";
    },
    post: function postLink(scope, element, attributes) {
     scope.number = scope.number + "55555 ";
    }
   };
  }
 }
});

//controller.js添加
dtControllers.controller('directive2',['$scope',
 function($scope) {
  $scope.number = '1111';
 }
]);

//html
<body ng-app="phonecatApp">
 <div ng-controller="directive2">
  <example-directive></example-directive>
 </div>
</body>
运行结果:
Hello 1111 22222 44444 55555!
由结果可以看出来,controller先运行,compile后运行,link不运行。
将上例中的compile注释掉的运行结果:
Hello 1111 22222 33333!
由结果可以看出来,controller先运行,link后运行,link和compile不兼容。
简单解析:
指令的控制器和link函数(后面会讲)可以进行互换。区别在于,控制器主要是用来提供可在指令间复用的行为但link链接函数只能在当前内部指令中定义行为,且无法再指令间复用。
更多了解可以参考Angular官方站点:https://angularjs.org/
以上就是本文的全部内容,希望对大家的学习有所帮助,也希望大家多多支持好代码网。

