Tint 着色器
优点:去除“无用”图片,节省空间
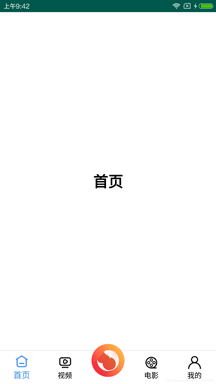
配合BottomNavigationView,实现一个快速,简洁的Tab栏
传统做法
Tint 着色器
优点:去除“无用”图片,节省空间
配合BottomNavigationView,实现一个快速,简洁的Tab栏
传统做法:Tab 切换,字体变色、图片变色。至少给我提供八张图,四张默认,四张选中,然后通过 selector 文件设置
现在BottomNavigationView只需四张图!!!
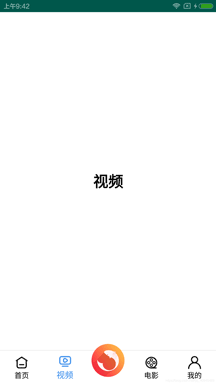
依赖(AndroidX)
implementation 'com.google.android.material:material:1.1.0-alpha01'
布局
<?xml version="1.0" encoding="utf-8"?>
<RelativeLayout xmlns:android="http://schemas.android.com/apk/res/android"
    xmlns:app="http://schemas.android.com/apk/res-auto"
    xmlns:tools="http://schemas.android.com/tools"
    android:layout_width="match_parent"
    android:layout_height="match_parent"
    android:background="@color/white"
    tools:context=".MainActivity">
    <FrameLayout
        android:id="@+id/fLayout"
        android:layout_width="match_parent"
        android:layout_height="match_parent"
        android:layout_above="@+id/nav_bottom_menu"
        android:background="@color/bg" />
    <View
        android:layout_width="match_parent"
        android:layout_height="0.5dp"
        android:layout_above="@+id/nav_bottom_menu"
        android:background="#FFE1E0E0" />
    <com.google.android.material.bottomnavigation.BottomNavigationView
        android:id="@+id/nav_bottom_menu"
        android:layout_width="match_parent"
        android:layout_height="wrap_content"
        android:layout_alignParentBottom="true"
        app:itemBackground="@null"
        app:itemIconTint="@color/tint_selector_menu_color"
        app:itemTextColor="@color/tint_selector_menu_color"
        app:labelVisibilityMode="labeled"
        app:menu="@menu/nav_bottom_menu" />
    <com.makeramen.roundedimageview.RoundedImageView
        android:layout_width="55dp"
        android:layout_height="55dp"
        android:layout_alignParentBottom="true"
        android:layout_centerInParent="true"
        android:layout_marginBottom="12dp"
        android:src="@drawable/ic_log"
        app:riv_corner_radius="200dp" />
</RelativeLayout>
编写渲染颜色选择器-tint_selector_menu_color
<?xml version="1.0" encoding="utf-8"?>
<selector xmlns:android="http://schemas.android.com/apk/res/android">
    <item android:color="@color/orange" android:state_checked="true" />
    <item android:color="@color/black" />
</selector>
menu 文件中 icon-nav_bottom_menu
<?xml version="1.0" encoding="utf-8"?>
<menu xmlns:android="http://schemas.android.com/apk/res/android">
    <item
        android:id="@+id/iv_home"
        android:icon="@drawable/iv_home"
        android:title="首页" />
    <item
        android:id="@+id/iv_wechat"
        android:icon="@drawable/iv_wechat"
        android:title="视频" />
    <item
        android:id="@+id/riv_script"
        android:icon="@null"
        android:title="@null" />
    <item
        android:id="@+id/iv_pipi"
        android:icon="@drawable/iv_pipi"
        android:title="电影" />
    <item
        android:id="@+id/iv_mine"
        android:icon="@drawable/iv_mine"
        android:title="我的" />
</menu>
BottomNavigationView的点击事件
这里配合Fragmen
/* Menu显示彩色图标 */
        //navBottomMenu.setItemIconTintList(null);
 /* 导航栏点击事件 */
        navBottomMenu.setOnNavigationItemSelectedListener(new BottomNavigationView.OnNavigationItemSelectedListener() {
            @Override
            public boolean onNavigationItemSelected(@NonNull MenuItem item) {
                switch (item.getItemId()) {
                    case R.id.iv_home: {
                        FragmentManager.startFragmentHome(Fragment_A.class);
                        return true;
                    }
                    case R.id.iv_wechat: {
                        FragmentManager.startFragmentHome(Fragment_B.class);
                        return true;
                    }
                    case R.id.iv_pipi: {
                        FragmentManager.startFragmentHome(Fragment_C.class);
                        return true;
                    }
                    case R.id.iv_mine: {
                        FragmentManager.startFragmentHome(Fragment_D.class);
                        return true;
                    }
                    default:
                        break;
                }
                return false;
            }
        });
配合ViewPager实现Tab栏
 /* 限制页面数,防止界面反复重新加载  */
    viewPager.setOffscreenPageLimit(4);
 // ViewPager 滑动事件监听
        viewPager.addOnPageChangeListener(new ViewPager.OnPageChangeListener() {
            @Override
            public void onPageScrolled(int i, float v, int i1) {
            }
            @Override
            public void onPageSelected(int i) {
            //这里我做了中间凹凸按钮,所以要特别处理以下
            //如果没有我这种情况的,直接加上这个  navBottomMenu.getMenu().getItem(i).setChecked(true); 就不用再加switch语句了
                switch (i) {
                    case 0:
                        //将滑动到的页面对应的 menu 设置为选中状态
                        navBottomMenu.getMenu().getItem(i).setChecked(true);
                        break;
                    case 1:
                        //将滑动到的页面对应的 menu 设置为选中状态
                        navBottomMenu.getMenu().getItem(i).setChecked(true);
                        break;
                    case 2:
                    case 3:
                        //将滑动到的页面对应的 menu 设置为选中状态
                        navBottomMenu.getMenu().getItem(i + 1).setChecked(true);
                        break;
                    default:
                        break;
                }
            }
            @Override
            public void onPageScrollStateChanged(int i) {
            }
        });
    }
对应的适配器
(仅供参考,大家也可以去参考以下别人写的代码)
public class FragPagerAdapter extends FragmentPagerAdapter {
    private List<Fragment> fragmentList;
    public FragPagerAdapter(@NonNull FragmentManager fm, List<Fragment> fragmentList) {
        super(fm);
        this.fragmentList = fragmentList;
    }
    @Override
    public Fragment getItem(int position) {
        return fragmentList.get(position);
    }
    @Override
    public int getCount() {
        return fragmentList.size();
    }
}
BottomNavigationView实现的Tab栏,比自己以前写的代码更加简洁明了!!!
以上就是Android开发快速实现底部导航栏示例的详细内容,更多关于Android底部导航栏的资料请关注好代码网其它相关文章!

